The ongoing Coronavirus pandemic is impacting every part of our lives. Besides, it has wide-ranging ramifications for marketing, advertising and eCommerce as well as several other sectors like travel, entertainment and FMCG. As opposed to, the pandemic has defined a new category of goods called “new essentials.” New essentials are products that help consumers feel
View Composers:
View Composers are callback or a class method that gets executed when a view is rendered. That means when Laravel loads a *.blade.php file to serve to the browser to display contents it executes View Composers.
When to Use:
Suppose we have some data, we will be needing on multiple views or on any layout file that gets loaded into multiple views. Writing the logic or executing a query inside the blade is bad practice. Or passing the data from multiple controller functions is not a good idea either. That’s exactly when view composers comes into play. Let me give you some example and procedure on how to use view composers to bind data to multiple views using a single logic location.
Procedure to use View Composers:
Suppose we have an e-commerce application that has many categories stored in DB. And we will need the categories list in every view that is being rendered.
We can send the categories to home page like this
public function index() { $categories = Category::all(); return view('welcome', compact('categories')); }
Rendered Data
If we need the category list on /home page, we’ll have to do the same query for the same listing in different function. Now imagine what if we need the data on many pages. Doing that same query over and over again makes it hard to maintain code base. But using View Composers, we can pass the data to multiple view files from one logic block. Let me show you how we can do that.
First lets create a ViewComposer Service provider by running command php artisan make:provider ComposerServiceProvider
The newly created ComposerServiceProvider will look like this.
Now let’s add the ComposerServiceProvider class to config/app.php providers array so that Laravel can recognise it.
On the next step lets create a View Composer CategoryComposer class inside App\Http\ViewComposers folder.
Modify the boot method in the new Provider by adding a composer method that extends view().
public function boot()
{
    view()->composer(
        'app',
        'App\Http\ViewComposers\CategoryComposer'
    );
}
Laravel will execute a CategoryComposer@compose method every timeapp.blade.php is rendered. This means that every time the view is loaded , we will be ready to show the categories in home.blade.php & welcome.blade.php with the categories list from our view composer.
Next, we’ll pass the categories list from our view composer to our views from the compose method.
public function compose(View $view)
{
    $categories = Category::all();
    $view->with(['categories' => $categories]);
}
Now we can access the categories array on both view files without needing to send data from multiple controller functions.
** Controller **
public function index()
{

    return view('home');
}

public function welcome()
{

    return view('welcome');
}
Accessing the categories array on welcome.blade.php
Note: It is possible to create a view composer that is executed when all views are rendered by replacing the view name with an asterisk wildcard
view()->composer('*', function (View $view) {
    //Logic block
});
That’s all for today. See you one the next one.
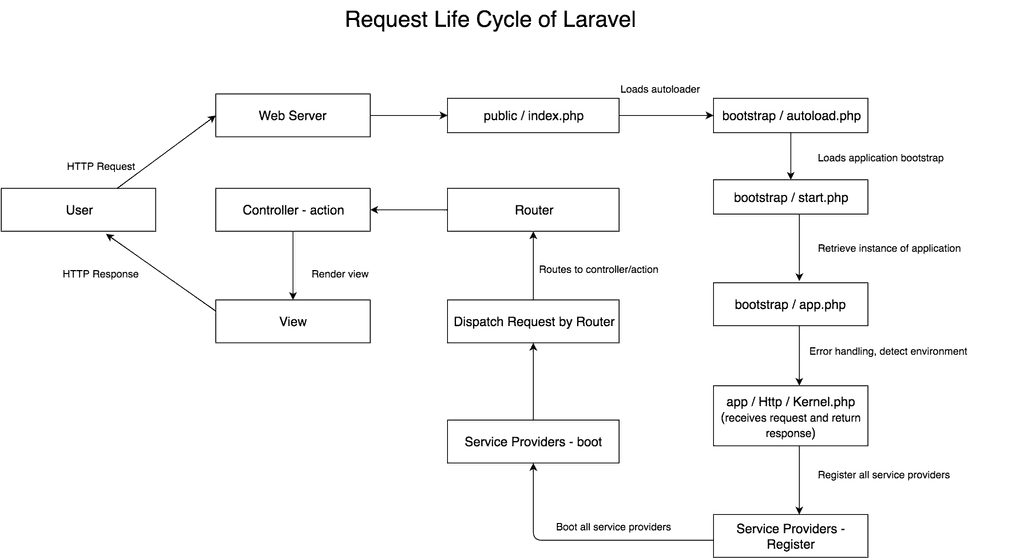
Hey there! I have been developing a laravel based application for more than a year now. I know a thing or two about how to write code on Laravel but truth to be told; I know very less about how Laravel handles all the executions under the hood. Recently I & some of my colleagues have decided to learn how laravel works its magic. So as a part of that, I studied “Laravel Request Lifecycle” today. And I am going to share what I learned from it. Yes, I know you can read about that on laravel documentation, but in this blog, I am going to break it down step by step.
But first, let me give you a quick example of why you should learn about that. Take riding a motorcycle, for example. It’s not mandatory to learn how the motorcycle engine works, simply learning how to ride a bike is enough. But when you know about its engine, how it works, what kind of oil it requires, it’s capabilities, then you become more confident while riding it. Because you know everything about and that gives you more confidence utilizing its full potential. Learning what happens under the hood of the Laravel framework is almost same. In my opinion, It’s essential to understand the inner workings of any tool you are given to work with, a complete understanding of that tool will enable you to use all the power that comes with the tool.
Auto loader
The entry point (Eg: https://https://shoroborno.com or any other URL) for all requests to a Laravel application is the public/index.php file. All requests are directed to this file by your web server (Apache / Nginx) configuration. If you are familiar with Laravel, I think you have seen the file. It doesn’t have much code in it. It’s simply an entry point which loads all the necessary files to handle the request you submitted from your web browser.
HTTP / Console Kernels
The next step occurs on the Kernel part of the application. There are two kinds of Kernel request HTTP or Console.
The request is sent to either HTTP or Console Kernels based on the request which has been sent to the application. These two Kernels acts as a central location that all requests flow through. For this blog, let’s focus on the HTTP part of Kernels which handles the requests sent to your application via HTTP method which is located in app/Http/Kernel.php .
It receives a request and returns a response. All of this is accomplished by the handle method available to the Kernel class. Once the handle method recognizes an HTTP request, it returns an HTTP response. The Kernel class extends the Illuminate\Foundation\HTTP\Kernel class, which contains a bootstrap method. This method checks if our application has been bootstrapped (the process of starting or resetting ) already. If not, the bootstrap method runs on a bunch of classes to bootstrap the application. It loads the configuration file, also loads the environment variables, handles exceptions, registers facades and also registers the application’s service providers. The application’s default service providers are stored in the app/Providers directory.
The Kernel also defines a list of HTTP middleware that requests needs to pass through before being handled by your application. So what middleware does? It merely filters your requests that are trying to enter your application. For instance, you don’t want to give the user access to some page without being logged in. You can handle that by using middleware in your route files.
Service Providers
One of the most important Kernels bootstrapping actions is loading the service providers for your application. All of the service providers for the application are configured in the config/app.php configuration file’s providers array. First, the register method will be called on all providers, then, once all providers have been registered, the boot method will be called.
Service providers are responsible for bootstrapping all of the framework’s various parts, such as the database, queue, validation, and routing components. Since it configures all the features offered by Laravel, it’s the essential component of your Laravel application.
Dispatch Request
Once the service providers bootstrap the application, the request is now passed to the router for dispatching. The router will dispatch the request to a route file or to a controller to handle the further process. For instance, getting data from database and showing them on a page or storing data to the database.
Now let me give you a step by step request life cycle that will help you visualize the steps mentioned above.
Once the user hit this URL, the browser will send the page request over the Internet to the web server (Apache or Nginx).
Step 3
The web server will receive the request and analyze the request information. In the web server’s configuration file, the site’s root path is specified. Based on that, the web server will look for index.php file in that root directory, since URL doesn’t contain any subdirectory or any other routes.
Step 4
Web server will direct the request to public/index.php file of laravel application.
public/index.php
Step 5
In this step, PHP Interpreter is executing the code contained in the index.php file from the request. During this step, auto loader files which are generated by composer will be loaded.
Step 6
Then it will create the laravel instance and bootstrapping the components of laravel.
Step 7
The kernel will receive the request, load the service providers and will be redirected to router.
Step 8
Router will render the view file content and return back to web server.
Step 9
Web server receives the output from PHP and sends it back over the Internet to a user’s web browser.
Step 10
The user’s web browser receives the response from the server, and renders the web page on user’s computer.
Rendered web page
I hope this helps you understand the request life cycle. You can also learn more about it from the Laravel documentation.
Just writing code is never enough. Anyone with a couple of months practice can do that. Most of us have the misconception that a good Software Engineer means he knows a lot of programming languages. That’s genuinely not the case. Yeah, learning one or two new programming language benefits. But that doesn’t help you become a good Software Engineer.
The software engineering culture is very much intimidating. It’s fun & challenging at the same time. If you love sticking to your laptop and solve interesting problems, then this might be the most passionate job you can look for. I am neither a nerdy engineer or expert on this culture. Today I am going to share what I observed & learned to work as a Junior Software Engineer for last one year. Yeah, folks, it’s been one year already ;). So let’s begin…
The range of skills required to become an excellent software engineer is vast. Like I told already learning to code is not enough. You need to learn a lot of other things too. It might seem a little bit overwhelming, trying to learn new things while adapting with this rapidly growing industry. But hey everything comes with a price.
Be humble
Be confident about your skills. But don’t be confident that much that you start feeling like you know everything. Once you start feeling that there’s no way you are going to learn something new. Truth be told the field is so vast that there’s no possible way you know everything. You will always have lacks. And without that, how would you know that you need to learn something new. So always have the attitude that you don’t know everything and willing to learn whenever required.
Learn to write clean code
Clean code and easy to understand code is a must. Your code should be easily understandable by the next person who looks over it. None of us likes messed up codes. You can learn writing clean codes by practice, getting ideas from seniors, reading blogs about it. My theory is that “Your code should be more beautiful than your attire” Let me give you some essential points to keep in mind while writing codes.
Meaningful variable name
Meaningful function/method name along with function documentation
Maintain spaces & tabs wherever needed
Avoid duplicating codes or unnecessary queries
This list goes on and on. It’s better to keep reading articles about it. Different programming languages have different coding structure. Follow those articles based on the programming language you are working.
Practice
The practice is the hardest part of learning. And it’s the essential part of your learning curve. You need to practice not once a month or week; you should practice every day. Even great musicians or artists practice their skills on a regular basis.
Learning theory and exploring new ideas is, obviously, essential to improving yourself in any discipline. The most important step, though, is turning those concepts into engrained knowledge and muscle memory. In this way, programming is a lot like learning an instrument.
Until you burn in those core concepts and you will need to continue to learn these throughout your career, you will struggle with the basic components of programming, for example-
Ways to approach a problem
How to break it down
How to test your code and find bugs
Quickly narrowing down the source of bug
How to improve performance and maintainability.
Validate users input.
Check with conditional statements to avoid errors.
On the surface, this seems like a dumb question, but it isn’t! Practicing an instrument diverges from programming because you can pick up a piece of music and play that same piece over-and-over until you get better. Programming doesn’t work quite the same way, because once you’ve solved a problem, you can, at best, iterate on that solution to improve it.
Don’t ask questions immediately
When you find yourself stuck somewhere, don’t start asking a question immediately. Try to solve that with any possible solution you can come up with. And if that doesn’t help, then start googling stuff or take suggestions from others. Find the solution and try to understand what you did wrong compared with the solution you found.
Don’t hesitate to ask or discuss
Don’t feel embarrassed by asking questions. It may feel little weird but trust me whenever you are stuck on a task for more than 30 minutes you really should ask a question or discuss with others. It will improve two things (1). Improvement with teamwork (2) Also has the ideas on how people approach different solutions for the same problem.
Find something to work on
The best way to learn is to find a problem you want to solve and try to solve it yourself. Maybe you want to automate something or calculate some value regularly.
Keep your eyes open in your own life for things that you would like to work better, or try to improve on something you already use. Then try to research and see if you can solve it. Don’t get caught up in finding a “perfect” solution, instead see how close you can get in a short amount of time.
These little exercises will keep your mind fresh and have the benefit of having no fixed goal so that you can have fun with them.
That’s all for today. Sorry for this looooooong article :p
This blog is not intended to make you feel bad about your coding skills. Let’s be honest we make mistakes and that’s the point we can learn from. Been in the IT industry for almost a year, I do make a lot of mistakes every day, but looking back at a time that rate changed from hundreds to ten or fifteen. Make mistakes, learn from it & don’t be ashamed of that. Today I’m going to point out some mistakes I did as a programmer and how I learned from it. The list is just in random order.
1. Plan before you start to write code
When we are assigned to write a code for a specific functionality without adequately understanding the problem statement or without any planning, we jump off and start writing codes. It needs planning & research. Think of writing code as art. You can’t jump off and start drawing you’ll have to plan what you want to draw, how you are going to draw, what are the things you are going to need to draw that. Same goes for writing codes also. You need to plan how you are going to solve the problem, research how to make it better, data you are going to need to complete the functionality. If you are working with a team, discuss with other members, plan your goal, draw diagrams, take notes, to make everything clear in your mind or if you are working alone, give yourself some time to think of possible solutions and choose the best from them and then start writing.
One of the great mistakes was to jump in and start coding without thinking of the impacts or anything. It might work for small projects but not for big ones and once done check and recheck every line of code. Make it even better.
2. Improving code quality
Like I told already think of writing code as art. Your art should be beautiful, right? So why your code shouldn’t be? We often make the mistake of not following some standard protocols to make codes readable.
Choose variable names wisely. Your variable name should describe what kind of data it’s holding. For instance, I am fetching some students data from the database of a particular school using Laravel.
Which variable name suits better for the data you are fetching? It’s $students, right? Same goes for function names, classes names and other files name.
Write documentation before each function. What parameter it receives, what the function does, what it returns, comment in some lines if needed. So that whenever another person reads the code, it’s readable for him. If your code is not readable, it’s complete trash.
Avoid duplicating codes. If you need specific functionality in different places, you shouldn’t write that code in different files every time. Just write it in some other file. And, call the function from where you need.
Follow MVC rules. Write the different type of codes in different files. Make separate folders for separate fill types.
Use spaces, comma, new line where necessary.
3. Coding alone while watching tutorials & reading documentation of a programming language
Another mistake we always do is not to follow along and write code while watching tutorials. It’s a good practice to watch and write code that helps you to understand better. That’s an excellent chance to practice what you are trying to learn.
Reading the documentation of a programming language is a must. Most of the time, we only focus on just watching tutorials. But, it’s always better to read the official documentation of the programming language you are trying to learn. It gives you the inside of that language also a better understanding of every features that language provides.
4. Performance improvement
Most of the time, we focus just on the functionality without giving much thought about its performance, user input validation, security vulnerabilities We have the habit of assuming everything works. Every line of code should be bulletproof, that means 100% performance in any possible scenario.
Reduce database query if possible.
Check every possible input that can come from user and validate
if your code hurts other functionalities,in that case Check & recheck.
Have a clear understanding of data changes and possible outcome after the function executes.
Your code shouldn’t bring any security threats to the system.
Try to reduce the number of iterations.
find out what Exception the function might through and correctly handle that Exception.
Try to understand other peoples code & question those if those are not well documented or readable.
Find bugs and solve them. “Ignorance is bliss” but not in this case.
Learn to use debugging tools.
5. Admit that you don’t know everything
We are human beings. It is a fact that we are not perfect & we don’t know everything. You always have something to learn. But, when you start to think that you know everything that will be your greatest mistake of all time because, when you lose the interest to learn anything new, and if you are not learning anything new, you won’t survive in this ever-growing IT industry. If someone finds out mistakes in you, appreciate them. Appreciate code reviewers. Take their suggestion into accounts.
6. Learn to ask for help & learn to google
It’s always good to ask for help if you are stuck somewhere for a long time. Talk with experts & discuss your issue, they might guide you for a solution Learn to search in google. There’s 99% possibility that the problem you stuck on right now someone else must have faced that too. They may have asked it on forums, and some others may have given some outstanding solutions. Learn to R&D, and the best way doing that is to Google it and find out the solution, you are looking for.
7. Stop being scared & doubting yourself
The number one mistake you can make as a beginner programmer is to think you’re not good enough, not smart enough and you’ll never get it. I believe that anyone can learn to program to at least a basic level if they stick with it.
Code may seem like an incomprehensible wall of alien language at first. That’s normal! But, bit-by-bit you learn what each part does, and it’s not scary anymore, and then you see it’s really all very logical when you know what it means.There’s an element of natural talent for programming and logical thinking, but it’s massively outweighed by hard work and hours spent plugging away at your code, reading tutorials and looking-up documentation.
Master your fear, or fear will be your master!
That’s all that came out of my head while writing this blog. Surely I’ll make many mistakes & learn from those in the future. And I will share those too. Till then keep on coding, make mistakes, learn from them, start improving your codes.
In the last blog, we installed our first Laravel application on our local machine and served it using php artisan serve. But we didn’t connect any database or anything. So today we are going to do that. Instead of serving our Laravel application with php artisan serve command on local machine, we are going to serve our application using Vagrant a virtual machine that take cares of all the dependencies for your application. I don’t want to go in the details of what the Homestead or virtual machine or vagrant is. You can simply just google about them or visit Laravel official documentation for that. So without farther a due let’s get started- “Installing Homestead”.
Installation Process
As we are going to install a virtual machine first, you need to enable virtualization from your local PC BIOS settings. After that download any virtualization software that you prefer. In my case, I used Virtual box. So just go to their website download the one which suits your PC configuration and install. After installing Virtual box, you need to install vagrant for your PC. To do that visit https://www.vagrantup.com/downloads.html . After that download the one which suits your PC configuration. As I am Ubuntu user, I downloaded the Debian package.
Adding Laravel/Homestead box to vagrant installation
Now, we need to add Laravel/homestead box to our vagrant installation. So to do that open up your terminal type in this command vagrant box add Laravel/homestead and hit enter. After that type in 3, if you are using virtual box and press enter. Depending on your internet speed, it may take 30-45 minutes to download.
If you are following correctly till now, you are ready to install Homestead.
So just copy git clone https://github.com/laravel/homestead.git ~/Homestead this git command and clone this repository by typing in this line in terminal. After cloning this repository cd into this directory from your terminal by cd Homestead. After that inside Homestead directory on your terminal, enter bash init.sh ( for Ubuntu/Linux/Mac) or init.bat (For windows) .
Connecting Our Application with Homestead
Now all the installations steps are done. Finally we are ready to serve our application. But first let’s make some necessary changes to connect our application with Homestead. So go to your homestead directory on your PC from file explorer or any GUI application.
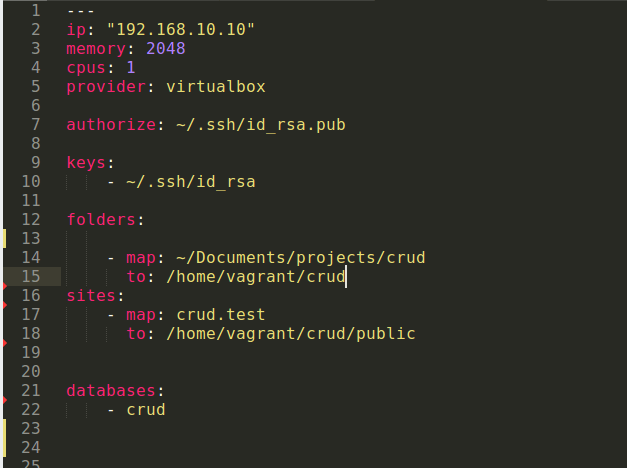
Open Homestead.yaml file in any text editor.
Homestead.yaml
In this file on the folders section
-map: ( Type the directory of your project folder)
to:( location of your application in vagrant virtual machine)
Sites section: -map: (any domain you want for your application except .com domain for instance for my crud app I used crud.test)
to: (location of the index.php file which is in public folder of your project) we need to map inside the public folder inside vagrant.
databases: just type the database name you prefer for your application. I used crud for my project. After doing all of that save the file and open your hosts file.
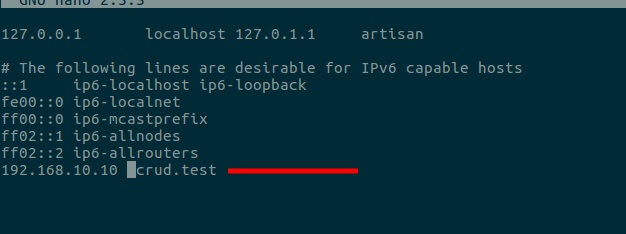
For ubuntu open your terminal cd into etc folder ,
cd /etc .
Open hosts file by sudo nano hosts in your terminal from etc directory. And, add the domain name, you added in Homestead.yaml crud.test . After that press ctrx+x to exit and Y to save and hit enter to save the modified hosts file.
Fire Up Vagrant to Serve Our Application
We are almost done for now. Time to fire up vagrant and serve our application. So go to your terminal, cd into Homestead folder type and enter vagrant up to fire up vagrant/our virtual machine.
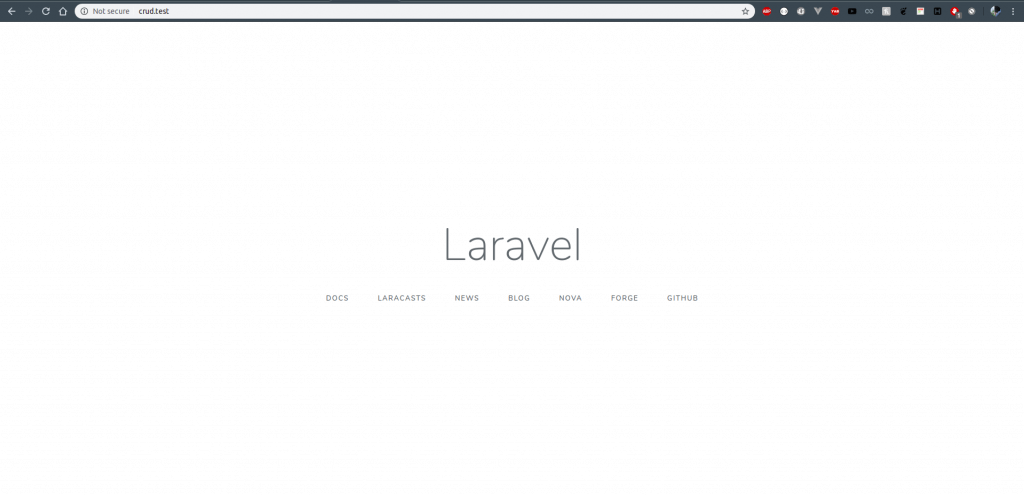
Now our application should be running on localhost on this domain crud.test. Just verify that by opening your browser and visiting this address crud.test
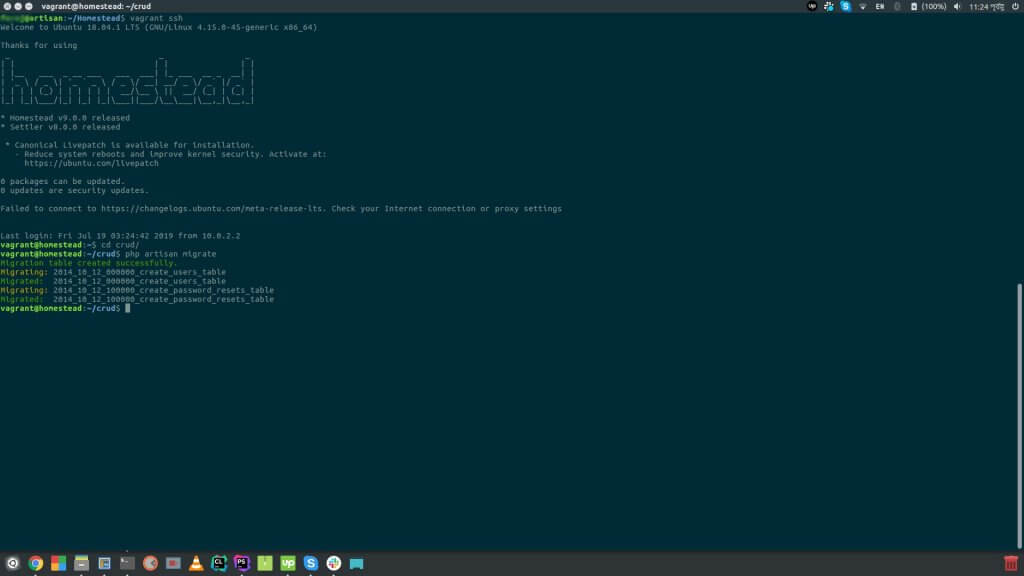
Now let’s connect our database with our application and check if everything is working perfectly as should. So to do that first lets use php artisan make:auth command to create Laravel default authentication/login system. To do that ssh into your vagrant machine from terminal. cd Homestead -> vagrant ssh -> cd crud . Now if you are inside crud project folder inside vagrant, run auth command and create default authentication method.
Now open your project folder. Copy .env.example file to .env and open the .env file.
For DB_Database = your database name for this project DB_USERNAME = homestead
DB_PASSWORD = secret.
And, everything is done. Now run php artisan migrate to migrate your database columns to your database you created from your virtual machine.
And, everything is done. You might be wondering why going through all of these hassle. Well, at first to make our project encapsulated from OS dependencies to easily manage project. Also connecting to individual databases for individual application and many more. We are done for today. In the next tutorial, we will learn about Model, Controllers, route view and all of the fun stuffs.
In the previous blog ( Things you need to know about Laravel in 2019) I talked about Laravel and its origin, current and future position in the Web Application/Software development field. This is going to be a small series on Laravel where I will start from the basics and in the end you will have a ready to deploy small CRUD application. As you are following the tutorial I expect you have a basic understanding of Object-Oriented Programming PHP & MySQL. So in this tutorial series, we will follow the official laravel documentation. The documentation will help guide you through if you face any difficulties. So let’s begin.
In this tutorial, we’ll learn the basics of Laravel application installation and running your first Laravel starter application.
Installation:
To start building your first Laravel application you’ll need to install some dependencies first. As the Laravel framework has few requirements So Homestead comes with all the requirements you need to work on your Laravel application. Homestead is an official virtual machine for Laravel. In the next tutorial of this series, I’ll discuss everything you need to know about it. So, for now, will just stick to the most simple one. I am using Ubuntu but You may use any OS you prefer. Because Everything is almost the same. So there’s no need to panic.
As we are not using Homestead for this part of the tutorial, So you need to make sure you have PHP and its extensions installed on your local computer. Therefore I am assuming you have a basic understanding of PHP you should have PHP and its extensions installed on your system.
Now you need to install Composer on your machine. So to install composer just open up your terminal, type in the following command and press enter.
After installing composer run the command below to install composer for Laravel globally on your system.
Run composer to check whether the composer is installed properly or not.
Composer Installation check & Composer commands
composer global require laravel/installer
Once you are done installing composer you are ready to create your first Laravel starter application.
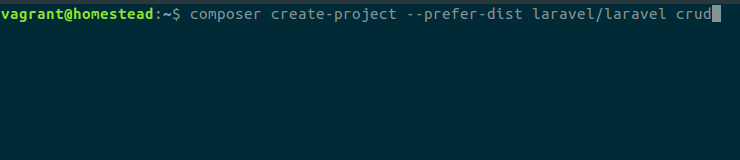
To create your first Laravel application run composer create-project --prefer-dist laravel/laravel crud. On this command “crud” is the name of the application. You can type any name you prefer instead of crud. As I prefer to create all my applications inside a folder to keep everything organized, So For me it’s inside the Documents/projects folder. So I will CD into the folder and run the command to create the application.
Creating a new project from composer command
After successfully running the command composer will start setting up a fresh Laravel application in your Documents/projects folder. And it will look like this.
Project files & folders
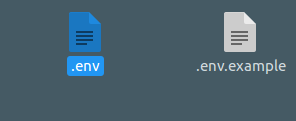
The next thing we need to do is to generate a unique application id for your Laravel application. To do that first you need to open up your GUI file explorer go inside your folder and copy .env.example to .env . It should look like this.
.env file
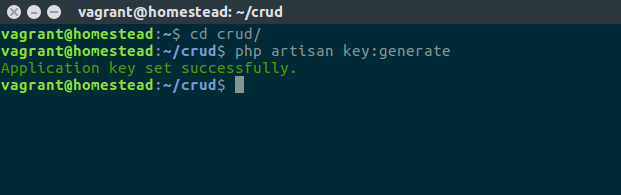
Now run php artisan key:generate from CLI tool/ terminal inside your project directory.
Artisan command to generate a key for the application
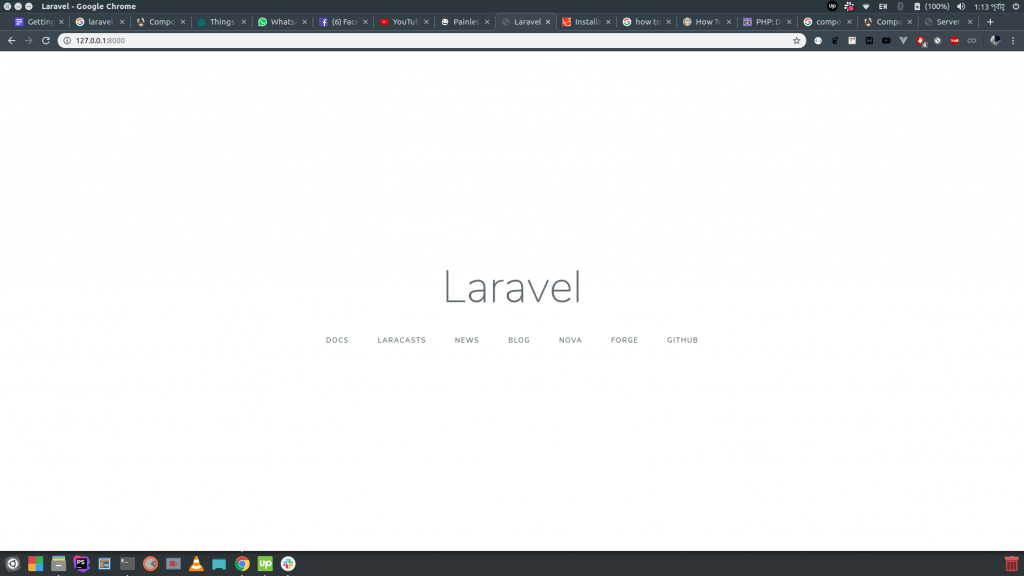
Now you are ready to run your application. And to do that type and enter php artisan serve from your terminal.
Serving the app on the local machine
And voila! your app is running on this local IP address. On my case which it’s running on http://127.0.0.1:8000 . Now open up your favorite browser and type in the url http://127.0.0.1:8000 .
Congratulations!
your application is ready to rock and roll.
And your starter application
This is just a basic laravel application so there’s not much to it. So in the next tutorial, we’ll Install Homestead and discuss how to use homestead with your laravel application. Connecting MySQL database and folder structure of laravel.
Taylor Otwell created Laravel mainly for web application development. Laravel provides an amazing experience while developing a web-based application. In order to understand Laravel, we’ll have to understand what PHP is.
PHP
At first, let’s talk about PHP. PHP which stands for Hypertext Preprocessor. PHP was introduced back in 1994 which is one of the most used programming languages over the internet. More than 80% of web applications are developed with PHP because of the combination of PHP & MYSQL. Till now PHP & MYSQL are one of the most rock-solid combinations in the web application development world and this combination is going to stay as rock-solid as it is right now. One of the most used web application Facebook is developed with PHP and now billions of people use it. If you have little bit idea about web applications, you might have heard about WordPress which is one of the most dominating technology for web applications developed using PHP. Learning PHP is a very easy task and it offers a whole lot of detailed documentation that helps the newbies to grasp everything easily. PHP provides all of the functionality that you need to develop a modern web application. To learn more about PHP, visit-https://en.wikipedia.org/wiki/PHP
Laravel
Now let’s talk about Laravel. As we have mentioned earlier that Laravel is a PHP framework. Now you may have a question what is framework? To simply put it, take making noodles as an example. You need to buy raw noodles pack, mix them with other ingredients, boil those things and cook and finally serve. That’s what basic programming language is. On the other hand, the framework is like a 2 minutes’ instant noodles pack, that means all ingredients are ready, all you have to do is just put some boiled water into the cup with some flavors and it’s ready to serve.
Laravel has been in the web application development game for a while now. Many developers all over the globe love it for its outstanding performance & easy to integration technique with other systems. It serves with many features that made this framework so popular over the last few years. Laravel follows MVC architecture which makes one of the most attractive framework to develop web applications. As it’s an open-source platform, there are thousands of contributors who are contributing to making this framework even more powerful. Laravel also comes with many packages which provide hundreds of important functionality to develop applications faster than before.
Current and Future Position of Laravel and PHP
Now let’s talk about its current and future position in the tech world. PHP and its framework are dominating the web world. PHP and frameworks built more than 80% web applications. As it’s getting more & more features and performance improvements in each update, Laravel & PHP will keep on dominating the web world in the upcoming future. Few people think that PHP is a dying language. It’s simply a myth & nothing else. PHP is not going anywhere in the recent future. As we have discussed earlier PHP & MySQL combination which is a rock-solid combination, and no other combination has come closer to this one. Until then there’s no possibility of any language taking the lead.
Should you learn PHP in 2019 and why?
Absolutely yes. There’s no harm in learning PHP right now. If you want to become a web application developer or you want to develop your career in the freelancing world, you can’t ignore PHP & it’s frameworks. Laravel makes it even easier to integrate with other famous front end technologies like VUE js, Node and many more. So If you are passionate about being a web application developer, Laravel is definitely a good choice to start with.
Finally, let me introduce you with a great team “Augnitive” experienced team of passionate engineers working with Laravel and they have been developing an application for the competitive industry for quite a while now. To learn more visit: https://augnitive.com/.
Want to receive a fortnightly round up of the latest tech updates? Subscribe to our free newsletter. No spam, just insightful content covering design, development, AI and much more.