The ongoing Coronavirus pandemic is impacting every part of our lives. Besides, it has wide-ranging ramifications for marketing, advertising and eCommerce as well as several other sectors like travel, entertainment and FMCG. As opposed to, the pandemic has defined a new category of goods called “new essentials.” New essentials are products that help consumers feel
If you are new to theweb & software development trade you might feel overwhelmed by the term of project management & the different methodologies. Scrum and agile methodology are the two most common terms you will hear about project management. But what are scrum & agile? Are they different? We will have a full discussion about scrum and agile methodology in this blog.
What is Project Management
Before we dive into the scrum & agile process we need to understand the core which is project management. Project management is the use of procedures, methods, expertise, information, and experience to achieve specified project goals within agreed-upon boundaries. It contains final deliverables that must be completed within a specific budget and timeline.
Project management entails the collaboration and implementation of an organization ordered to complete a specified job, event, or obligation. It might be a one-time project or a continuous process, with resources such as employees, funds, technology, and intellectual property
A fundamental distinction between project management and management is that project management has a final output and a fixed timeframe, whereas management is a continuous activity. As a result, a project professional must possess a diverse set of talents, including technical abilities, as well as people management abilities and commercial acumen.
Types of Project Management
There are different types of project management methods but all aim to do one thing which is the completion of a project. But different types of project management accomplish the project differently. Here are seven types of project management:
1. WaterFall Waterfall project management is one of the oldest & traditional methods of project management. This usually works in waves with each step depending on another. So the 1st must be completed before anyone could start the 2nd step.
2. Agile It is a more flexible and speedier alternative to the outmoded waterfall methodology. Agile is a concept or philosophy that is applied to different forms of project management, rather than a specific project management technique. Working in smaller pieces, or sprints, allows projects to pivot as required.
3. Scrum Scrum is part of the agile method. It’s quick, tiny in size, and can turn on a dime. Scrum is all about utilizing sprints to complete projects in tiny chunks, use of a month. Scrum is ideal for small teams who want to develop fast.
4. Kanban It is also another approach to agile project management. Kanban is all about organization, as opposed to Scrum, which is all about time-based parts. Kanban does this by focusing on the number of tasks that go into every process and how they may be simplified, decreased, and so on. This is an excellent model for people who have a consistent factory-like output.
5. Lean The lean approach of project management is focused on customer experience. While managing projects there are sometimes lots of processes that help to streamline the overall work but it’s not mandatory. Lean project management aims to trim these extra processes so that all efforts can be put into the customer experience.
6. Six Sigma Six sigma is just more like the lean process but it takes the lean approach to the next level. When the lean approach does not provide satisfactory results six sigma is implemented. It tries to enhance quality by lowering the number of mistakes in a process by identifying what isn’t functioning and then eliminating it.
7. PMI/PMBOK PMI stands for Project Management Institute which is a non for profit organization. PMI introduced PMBOK which stands for Project Management Body of Knowledge. This is nothing but a guideline for how a project should be managed.
There are more types of project management methodologies but these seven are the most common and widely used ones. As we are focusing on Agile & Scrum now we will discuss more on these two types.
What is Agile Methodology
It is a mentality influenced by the ideals and principles of the Agile Manifesto. These beliefs and concepts guide how to generate and respond to change, as well as how to cope with ambiguity.
Agile is an iterative method of project management and software development that enables teams to provide value to clients more quickly and with fewer difficulties. An agile team provides work in tiny, yet consumable, increments rather than staking all on a dramatic launch. Continuous evaluation of requirements, plans, and results provides teams with a natural mechanism for adapting swiftly to innovation.
This Agile methodology follows four principles which are:
1.Individuals and relationships are valued more than techniques and systems 2. Working software trumps over extensive documentation. 3. Customer involvement is given more preference over contract negotiations 4. Adjusting to change by being flexible with the plan
Now we will dig deeper into how Agile works. Though different teams will execute agile methods differently, there will always be five steps which makes this amazing process tic.
1. Requirement Analysis: This stage entails meeting with the customer and noting all of the specifics and functionality that they would want to see in their solution.
2. Precise Estimation: Now the functions will be grouped by user stories or modules. Time will be given to each module depending on how much time is needed for one feature.
3. Priority list: With an ongoing conversation with the client a list will be created based on the client’s priority. The features will be implemented 1st which are desired by the client.
4. Implementation: Now that you know the client’s goal and have the main narrative list in place, you can begin providing value to the client. You begin at the top with the most latest task and work down to the least relevant task. You solicit feedback from your customers after each delivery.
5. Plan Update: As you begin providing the product to the customer, he will make certain modifications. You can add such modifications to your list. You will reprioritize the list of things if necessary.
There’s a chance you’re not fast enough and won’t be able to finish the assignment on time. In such a situation, you will always offer the most critical and high-priority features. Work order is defined using the prioritized list.
What is Scrum
Scrum is nothing more than a subset of Agile Methodology. There are different approaches to it & Scrum is one of them. Scrum is a method for managing research and development and other types of software development work.
It is most suited for use when a cross-functional project is planned on a development venture with a large amount of work that can be divided into more than one 1 to 4 weeks cycle.
Scrum is empirical in the sense that it allows teams to form a hypothesis about how they believe something should function, test it out, reflect on the experience, and make the necessary modifications.
Scrum is designed in such a manner that teams may adopt methods from other frameworks where they make it work in the context of the team.
Just like the Agile method where it’s all about the values for the clients in the scrum, values are shared among the people who are working on the project. Here are few values which make scrum tic:
1. Committed: Team members make a personal commitment to accomplishing team objectives. 2. Resilience: Members of the team do the right thing and work hard to solve difficult challenges. 3. Concentration: Focus on the sprint’s task as well as the team’s goals. 4. Open-minded: Teams and stakeholders are straightforward about all of the work and problems that the team faces. 5. Trust: Team members value each other’s ability to be capable and self-sufficient.
One of the important practices of Scrum is a sprint. The Sprint is either one month or shorter timeframe in which the team creates a deliverable update. Sprints have few fixed features.
A sprint produces a steady time frame throughout a development project. A new Sprint begins soon after the preceding Sprint concludes. Sprint’s beginning and finish dates are set.
Difference between Scrum and Agile methodology
On the outside, it’s simple to understand why Agile and Scrum are frequently misunderstood, as they both rely on an iterative method, regular client engagement, and effective communication. The primary distinction between Agile and Scrum is that, while Agile is a project management concept that employs a sense of values or ideas.
On the other hand, Scrum is the process by which agile is implemented. You can also say that Scum is a type of Agile methodology. Here are few main differences between scrum and agile:
Agile
Scrum
Agile is a methodology
Scrum is a process of implementation of the methodology
Agile is best suited for a small but experienced team
Scrum is best for a diverse team where requirements are adaptive
Agile is a rigid method
Scrum is more flexible
Strong leadership is mandatory for the agile method
Scrum is dependent on team member’s self-organization
The progress is delivered to the customer regularly or on the customer demand.
The progress is shared once a sprint is completed.
On agile method, the team lead is responsible for all update
On scrum the scrum master designates tasks & all team members are responsible for all updates
Agile depends on face to face meetings depending on project needs
Scrum depends on daily stand up meetings which can also be done virtually
Agile is a project management technique that aims to satisfy customers by providing shippable products on a frequent basis. Scrum is one of several Agile implementation methods. It is appropriate for projects with constantly changing needs.
Developed by Google Flutter is an open-source UI software development kit. There are many Flutter Tips, Tricks, and Techniques for 2021 which will make your development process easy and fun. It is being used to build software from a single codebase for Android, iOS, Linux, Mac, Windows, Google Fuchsia, and the web. If you need to build any mobile application using Flutter you can give us a knock or if you are developing yourself here are 10 Quick Flutter Tips, Tricks, and Techniques.
1. Dismiss Keyboard Using Flutter
To dismiss Keyboard, we have to set focus on a different node as shown in the example below using the Gesture Detector.
If you need to execute a piece of code after some time in Flutter you have to use Timer class. Timer class will allow specifying the time which you need to delay the execution and after that time period code will be executed inside the Timer.
3. Show Item Separately From ListView Using Flutter
ListView makes its children scroll. Most of the time, we require a separator to distinguish between every child of ListView. This separator is basically a divider, which can be a line.
ClipOval widget clips the child widget in oval or circle shape. We can reshape the child widget by changing width and height. If width and height are equal the shape will be circular. If the width and height are given differently then the shape will be oval. Let’s understand this with the help of an example:
When you start your layout and know for sure some UI components will be custom, but you have no time to implement them yet: create dummy Containers:
ButtonContainer(child: child).
It serves as a proxy. Later it will be super easy to refactor the code
6. If Null Operator (??)
Checks If something is null. If it’s not null it returns its own value but if it’s null it returns the value after ?? return abc ?? 10; // returns 10 if abc is null else returns its own value.
It also has a shorthand assignment when it’s null.
abc ?? = 5 // assigns 5 to abc if it’s null
7. Always Use Final Variables In Your Stateless widgets.
It can sometimes be tempting to instantiate non-final variables in stateless widgets but that’s something you should always avoid because stateless widgets are immutable which means that they are not supposed to change even a bit! If you need a non-final variable, consider using a Stateful widget instead!
8. Set the background image to your Container using Flutter
Want to set the background image to your Container? And you are using a Stack to do so? There is a better way to achieve this result. You can use decoration to set the image in the container.
You can provide Images according to your need, also you can use the box decoration properties to provide shape and border.
9. Knock Out the iPhone Notch with Safe Area Using Flutter
It’s a horrible feeling when some of your content is getting cut by the iPhone X notch. The same could happen in Android. Consider using the SafeArea widget can keep the pesky notification bars and phone notches from encroaching on your app’s UI. It uses a MediaQuery to check the dimensions of the screen and pads its child Widget to match, making sure your app is safe on both iOS and Android!
10. Write Cleaner Code Using the Spread Operator with Flutter
The Dart 2.3 introduced a few useful features and one of them I like is the Spread operator. This is very useful when you need conditional UI widgets. Especially when you have nested conditional UI Widget.
Flutter is an absolute lifesaver when it comes to developing eye-catching applications on IOS and android. Here at Augnitive, we have some top tire Flutter developers who have developed a passion for Flutter. If you have any questions or if you are looking for a bit of help don’t hesitate to get in touch.
The ongoing Coronavirus pandemic is impacting every part of our lives. Besides, it has wide-ranging ramifications for marketing, advertising and eCommerce as well as several other sectors like travel, entertainment and FMCG.
As opposed to, the pandemic has defined a new category of goods called “new essentials.” New essentials are products that help consumers feel more comfortable under stay-at-home orders. This includes office supplies, fitness equipment, cosmetics, housewares, home improvement, toys, and hobby-related products as well as medicine and medical equipment. These goods account for almost 40% of all consumer spending right now around the world. 30% of the total 40% is beauty and cosmetics. Both fitness equipment and toys/hobbies account for 29% of the new essentials spending.
As the world begins to revert to the old habits in the upcoming few months, spending in this category is likely to decrease, but not completely disappear. Anyways, one important thing is how a customer can buy a product. Right now, of course, it can be from any eCommerce store with home delivery and from the previous statistics, we can say this habit will continue in large part of the customers in future.
Although the increase in shipping delays, eCommerce order volume has increased by 50% compared to 2019. During this Coronavirus pandemic, the eCommerce landscape is changing rapidly. Consumer priorities and behavior have shifted in recent weeks in response to COVID-19, and it means that eCommerce brands need to react quickly and swiftly to maximize organic traffic and revenue.
But those small businessmen who don’t have an eCommerce website, they should at least develop an eCommerce sitefor online shopping when Coronavirus has a great impact on eCommerce industry. Now this is the demand of the situation and age. Before developing their eCommerce site, they can follow my previous blog on (Top 5 eCommerce Trends For 2020), where I described the latest eCommerce trends for 2020.
Hopefully, we recover faster in the upcoming months from this situation.
Hope that you all like my last blog about Flexbox. Today we will learn more about Flexbox elaborately.
1. Flexbox Direction
Flexbox direction is a single direction concept. Flex has two direction horizontal rows or vertical columns. Flexbox direction property:
Suppose we want the menu in reverse order, change flex-direction value to row-reverse.
Output:
Another most exciting use of flex-direction is a sidebar menu. We can easily create vertical column-wise sidebar menus. Here we change the flex-direction to the column.
By default, flex items an order is source order. Suppose we have three items. Now we change the view order without changing the HTML.
Now we want item-2 to be the first position and then after item-1 is second and item-3 is third. We change it by merely copying paste item-2 before item-1, but now we don’t touch HTML code. We use flex order property. Now we see how to change their position.
HTML:
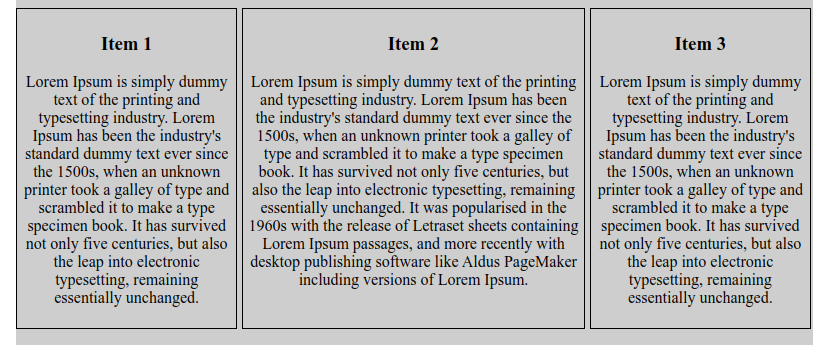
<div class="content">
           <div class="item">
               <h3>Item 1</h3>
               <p>
                   Lorem Ipsum is simply dummy text of the printing and typesetting industry. Lorem Ipsum has been the industry's standard dummy text
                   ever since the 1500s, when an unknown printer took a galley of type and scrambled it to make a type specimen book. It has survived
                   not only five centuries, but also the leap into electronic typesetting, remaining essentially unchanged.
               </p>
           </div>
           <div class="item">
               <h3>Item 2</h3>
               <p>
                   Lorem Ipsum is simply dummy text of the printing and typesetting industry. Lorem Ipsum has been the industry's standard dummy
                   text ever since the 1500s, when an unknown printer took a galley of type and scrambled it to make a type specimen book.
                   It has survived not only five centuries, but also the leap into electronic typesetting, remaining essentially unchanged.
                   It was popularised in the 1960s with the release of Letraset sheets containing Lorem Ipsum passages,
                   and more recently with desktop publishing software like Aldus PageMaker including versions of Lorem Ipsum.
               </p>
           </div>
           <div class="item">
               <h3>Item 3</h3>
               <p>
                   Lorem Ipsum is simply dummy text of the printing and typesetting industry. Lorem Ipsum has been the industry's standard dummy text
                   ever since the 1500s, when an unknown printer took a galley of type and scrambled it to make a type specimen book. It has survived
                   not only five centuries, but also the leap into electronic typesetting, remaining essentially unchanged.
               </p>
           </div>
       </div>
We don’t need to change HTML code where easily can change their order by using their flex order property.
3. Flexbox Grow property
This defines the ability for a flex item to grow if necessary. It accepts a unitless value that serves as a proportion. It dictates what amount of the available space inside the flex container the item should take up.
If all items have flex-grow set to 1, the remaining space in the container will be distributed equally to all children. If one of the children has a value of 2, the remaining space will take up twice as much space as the others (or it will try to, at least).
So today we learn about direction, order and the grow property of Flexbox.
View Composers:
View Composers are callback or a class method that gets executed when a view is rendered. That means when Laravel loads a *.blade.php file to serve to the browser to display contents it executes View Composers.
When to Use:
Suppose we have some data, we will be needing on multiple views or on any layout file that gets loaded into multiple views. Writing the logic or executing a query inside the blade is bad practice. Or passing the data from multiple controller functions is not a good idea either. That’s exactly when view composers comes into play. Let me give you some example and procedure on how to use view composers to bind data to multiple views using a single logic location.
Procedure to use View Composers:
Suppose we have an e-commerce application that has many categories stored in DB. And we will need the categories list in every view that is being rendered.
We can send the categories to home page like this
public function index() { $categories = Category::all(); return view('welcome', compact('categories')); }
Rendered Data
If we need the category list on /home page, we’ll have to do the same query for the same listing in different function. Now imagine what if we need the data on many pages. Doing that same query over and over again makes it hard to maintain code base. But using View Composers, we can pass the data to multiple view files from one logic block. Let me show you how we can do that.
First lets create a ViewComposer Service provider by running command php artisan make:provider ComposerServiceProvider
The newly created ComposerServiceProvider will look like this.
Now let’s add the ComposerServiceProvider class to config/app.php providers array so that Laravel can recognise it.
On the next step lets create a View Composer CategoryComposer class inside App\Http\ViewComposers folder.
Modify the boot method in the new Provider by adding a composer method that extends view().
public function boot()
{
    view()->composer(
        'app',
        'App\Http\ViewComposers\CategoryComposer'
    );
}
Laravel will execute a CategoryComposer@compose method every timeapp.blade.php is rendered. This means that every time the view is loaded , we will be ready to show the categories in home.blade.php & welcome.blade.php with the categories list from our view composer.
Next, we’ll pass the categories list from our view composer to our views from the compose method.
public function compose(View $view)
{
    $categories = Category::all();
    $view->with(['categories' => $categories]);
}
Now we can access the categories array on both view files without needing to send data from multiple controller functions.
** Controller **
public function index()
{

    return view('home');
}

public function welcome()
{

    return view('welcome');
}
Accessing the categories array on welcome.blade.php
Note: It is possible to create a view composer that is executed when all views are rendered by replacing the view name with an asterisk wildcard
view()->composer('*', function (View $view) {
    //Logic block
});
That’s all for today. See you one the next one.
Web development is the fastest-growing industry not only in Bangladesh but also around the world. To grab the dream job in this sector, do you have the skills to stand out from the crowd? On this blog, you can find top 10 basic skills for a web developer. So, Let’s go!
1.Constantly Learning and Keeping up to date with the industry
To become a great web developer, you should stay ahead of the curve. You have to learn new technologies and programming languages and focus on the customer’s needs and wants to keep them satisfied. You also have to keep yourself up to date with the industry; thus a better idea is to follow blogs like Sitepoint, Smashing Magazine, Hacker News etc. and of course our blog. To visit at least one conference in the related field each year should be included in your goal.
2. Time Management
In web development projects, the deadlines are always just around the corner. So, to stay efficient, it’s vital to manage your time as best as possible. Good developers struggle with it, but some can not maintain their time management skills. I’m sharing some quick, actionable tips so that you can manage your time correctly-
Make a to-do list
As a web developer, you have to maintain a regular to-do list, and it will help you to do your every task, resulting you can’t skip a job.
Set reminders
Reminder helps you to do a particular task at the right time.
Use the 80/20 rule
You can follow the 80/20 rule and try to find your daily tasks that eat away too much time without producing enough results. You may be surprised at how much time you’re spending every day doing things that take way too long for what you get out in return.
Communicate
When you get stuck on a task, don’t waste your time, communicate with your boss or senior to get a better solution.
3. HTML/CSS
We know that HTML, CSS and JavaScript are the three fundamental pillars of Web development. HTML (HyperText Markup Language) is a language that communicates with the web browser, and it dictates the structure of each page on the WWW (World Wide Web). It tells the browser how to interpret the data to form elements on a website. We use it to add style on our site, including the layout and design. We also use CSS (Cascading Style Sheet) to properly display in our website on different devices and screen sizes. HTML5 and CSS3 are the latest standards that work in the most common browsers out there.
4.JavaScript
When you are master in HTML and CSS, in the long run, you’ll want to learn JavaScript. JavaScript is one of the higher-level programming languages, and it prepares websites more interactive and functional. JavaScript will deliver you to create better experiences for users. You can write special features directly onto your sites with JavaScripts.
5. PHP
PHP (earlier called, Personal Home Page) is a server scripting language, and it is a powerful and useful tool for making dynamic and interactive web pages. PHP is a widely-used, free, and efficient alternative to competitors such as Microsoft’s ASP.
6. Responsive Design
Nowadays, many modern consumers use their mobile devices to conduct online searches. Around 60% of online searches occur on mobile devices. So, websites need to adapt to this trend. When websites aren’t consistent with mobile devices, web users don’t display well; users go to a competitive site. That is why a web developer needs to have responsive design knowledge.
7. GIT (Code Versioning)
Code versioning or version control helps you to track and control, but also revise any changes to your programming. Just imagine that you make a few smaller changes to your code and the whole web site stops working. The changes you made indeed had errors, the quickest and better solution is to track back to the last time of your code that worked.
8.Debugging
You can fix any errors or abnormalities in your code by the Debugging process. On average, a developer spends no less than 33 % of his time debugging.
9.Analytical Skills
Consumers behaviour is always switching. So, your design, coding as well as development skills will ever express for satisfying the ultimate customers. Therefore, every web developer needs a strong understanding of consumers, especially web consumers, and their need and want. If you can understand them on the whole, it will support you to create the best websites that sell.
10.SEO
In modern-day marketing, Search engine optimization (SEO) is working as the driving force. To get more traffic as well as increase ranking on Google, SEO is the most effective way. Websites that don’t implement SEO won’t show up high enough on search engine result pages. Page upload speed, keyword content, and domain credibility are just some of the SEO skills that web developers should learn.
Are you ready to discover the possibilities in a web development career? Adapt these 10 basic skills and to learn more about web developer skills and how to stand out from the competition, regularly visit our careers blog !
The FlexBox Layout Module makes it easier to design a flexible, responsive layout structure without using float or positioning. Before the flexbox layout module, there are four layout modules:
1. Block 2. Inline 3. Table 4. Positioned
To work with flexbox, we don’t need to install any extra plugins or software. It is a built-in property of CSS3. It is a layout to work. It’s straightforward to use in your project.
Browser Compatibility
Flexible Layout must have a parent element with the display property set to flex. Today we will learn how to place a logo center in the header section. First we create index.html file
Here you can see that we write no media query CSS to make it responsive. It’s already responsive. Now overview the CSS.
We put display flex on the parent class. Parent class also has two CSS property align-item and justify-content. Align-item is working on y-axis and justify-content working on the x-axis. If we want a content position in a horizontal center, we use justify-content: center, that places the content to center position. If we want a content position in a horizontal center, we use align-item: center, that places the content to center position.
/* Item Position alignment */
align-items: center; /* Make items around the center */
align-items: start; /* Make items from the start */
align-items: end; /* Make items from the end */
align-items: flex-start;/* Make the flex items from the start */
align-items: flex-end; /* Make the flex items from the end */
justify-content: center; /* Make items around the center */
justify-content: start; /* Make items from the start */
justify-content: end; /* Make items from the end */
justify-content: flex-start;/* Make the flex items from the start */
justify-content: flex-end; /* Make the flex items from the end */
In my next blog, we will talk more about Flex-box, with some other tricks…
We have discussed the fundamentals of JavaScript in my previous two blogs. Today I am going to discuss the rest of the fundamentals of JavaScript, and this is the final part of fundamentals series. Today we cover Switch case, Function, Arrow function, and JavaScript Special. Let’s get started.
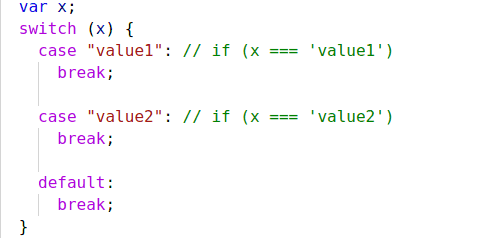
Switch Statement :
A Switch case statement can replace multiple if checks in a more descriptive way.
The Syntax :
The switch case has one or more cases with a default option. Here is the syntax:
The value of x is checked for strict equality to the value from the first case that is value 1 after that check value 2 and so on. If there the equality found then switch case start to execute code and after executing code unit execute break. If no equality found, then, it executes the default case.
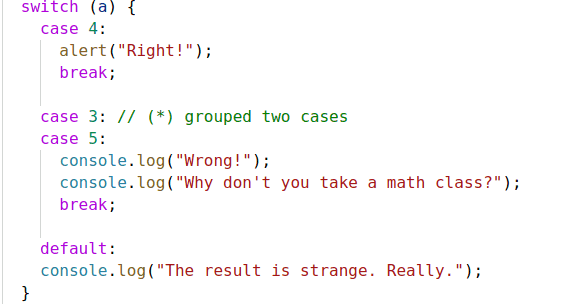
Grouping of Case :
If we want to execute multiple cases for the same value, we will use the Grouping case.
Take a look at the following example:
Grouping case
Now Case 3 and 5 show the same message. The ability to group we can know-how switch casework without break statement.
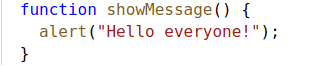
Function
Sometimes we need to use the same piece of code multiple times in the script. For example, in a script, we need to add two numbers multiple times. For that, we will write a function that takes two numbers as a parameter return sum of two numbers.
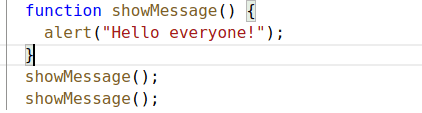
Function Declaration:
function
When we call the function like showMessage any part of the same function, showMessage function execute and show the alert.
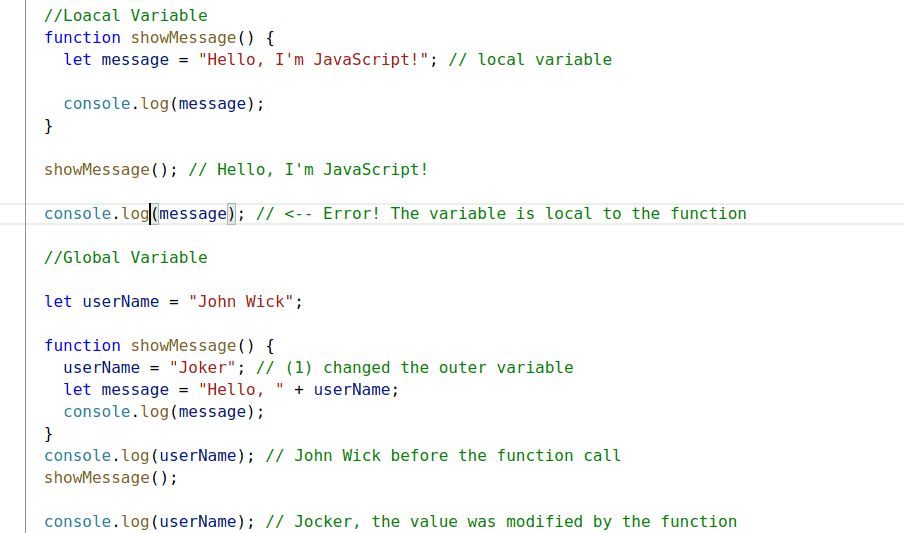
Local and Global variables :
Variable that declare inside any function that called a local variable, because we can not access those variables outside of this function.
A global variable that declared the outer side of the function, we can use those variables inside a function and all over in the script.
There we can get clear the concept of global and local variables. In the first function message a local variable (Declare inside a function) inside a function, console log the message, But outside the function, it will through an error because we can not access a local variable outside of the function. But we can access the global variable (Function 2 UserName) inside and outside any function and modify the value inside function.
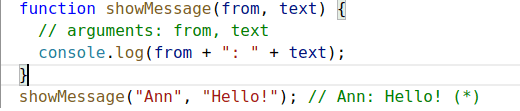
Parameters:
We can pass arbitrary data to function using parameters.
When the function is called in lines (**) the given values are copied to local variables from and text. Then the function uses them.
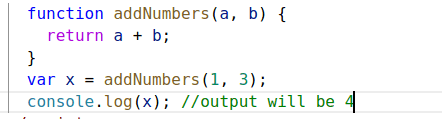
Returning Value:
A function can return value to the code wherefrom it called
Add Numbers function returns the sum of two number 1, and 3. We can save the value in a variable x. This way a function can return value.
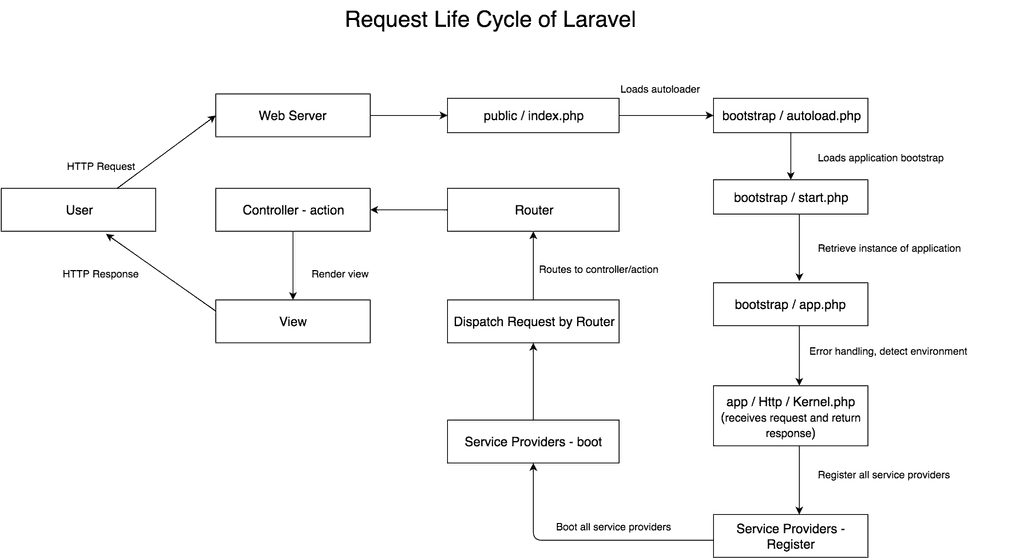
Hey there! I have been developing a laravel based application for more than a year now. I know a thing or two about how to write code on Laravel but truth to be told; I know very less about how Laravel handles all the executions under the hood. Recently I & some of my colleagues have decided to learn how laravel works its magic. So as a part of that, I studied “Laravel Request Lifecycle” today. And I am going to share what I learned from it. Yes, I know you can read about that on laravel documentation, but in this blog, I am going to break it down step by step.
But first, let me give you a quick example of why you should learn about that. Take riding a motorcycle, for example. It’s not mandatory to learn how the motorcycle engine works, simply learning how to ride a bike is enough. But when you know about its engine, how it works, what kind of oil it requires, it’s capabilities, then you become more confident while riding it. Because you know everything about and that gives you more confidence utilizing its full potential. Learning what happens under the hood of the Laravel framework is almost same. In my opinion, It’s essential to understand the inner workings of any tool you are given to work with, a complete understanding of that tool will enable you to use all the power that comes with the tool.
Auto loader
The entry point (Eg: https://https://shoroborno.com or any other URL) for all requests to a Laravel application is the public/index.php file. All requests are directed to this file by your web server (Apache / Nginx) configuration. If you are familiar with Laravel, I think you have seen the file. It doesn’t have much code in it. It’s simply an entry point which loads all the necessary files to handle the request you submitted from your web browser.
HTTP / Console Kernels
The next step occurs on the Kernel part of the application. There are two kinds of Kernel request HTTP or Console.
The request is sent to either HTTP or Console Kernels based on the request which has been sent to the application. These two Kernels acts as a central location that all requests flow through. For this blog, let’s focus on the HTTP part of Kernels which handles the requests sent to your application via HTTP method which is located in app/Http/Kernel.php .
It receives a request and returns a response. All of this is accomplished by the handle method available to the Kernel class. Once the handle method recognizes an HTTP request, it returns an HTTP response. The Kernel class extends the Illuminate\Foundation\HTTP\Kernel class, which contains a bootstrap method. This method checks if our application has been bootstrapped (the process of starting or resetting ) already. If not, the bootstrap method runs on a bunch of classes to bootstrap the application. It loads the configuration file, also loads the environment variables, handles exceptions, registers facades and also registers the application’s service providers. The application’s default service providers are stored in the app/Providers directory.
The Kernel also defines a list of HTTP middleware that requests needs to pass through before being handled by your application. So what middleware does? It merely filters your requests that are trying to enter your application. For instance, you don’t want to give the user access to some page without being logged in. You can handle that by using middleware in your route files.
Service Providers
One of the most important Kernels bootstrapping actions is loading the service providers for your application. All of the service providers for the application are configured in the config/app.php configuration file’s providers array. First, the register method will be called on all providers, then, once all providers have been registered, the boot method will be called.
Service providers are responsible for bootstrapping all of the framework’s various parts, such as the database, queue, validation, and routing components. Since it configures all the features offered by Laravel, it’s the essential component of your Laravel application.
Dispatch Request
Once the service providers bootstrap the application, the request is now passed to the router for dispatching. The router will dispatch the request to a route file or to a controller to handle the further process. For instance, getting data from database and showing them on a page or storing data to the database.
Now let me give you a step by step request life cycle that will help you visualize the steps mentioned above.
Once the user hit this URL, the browser will send the page request over the Internet to the web server (Apache or Nginx).
Step 3
The web server will receive the request and analyze the request information. In the web server’s configuration file, the site’s root path is specified. Based on that, the web server will look for index.php file in that root directory, since URL doesn’t contain any subdirectory or any other routes.
Step 4
Web server will direct the request to public/index.php file of laravel application.
public/index.php
Step 5
In this step, PHP Interpreter is executing the code contained in the index.php file from the request. During this step, auto loader files which are generated by composer will be loaded.
Step 6
Then it will create the laravel instance and bootstrapping the components of laravel.
Step 7
The kernel will receive the request, load the service providers and will be redirected to router.
Step 8
Router will render the view file content and return back to web server.
Step 9
Web server receives the output from PHP and sends it back over the Internet to a user’s web browser.
Step 10
The user’s web browser receives the response from the server, and renders the web page on user’s computer.
Rendered web page
I hope this helps you understand the request life cycle. You can also learn more about it from the Laravel documentation.
Just writing code is never enough. Anyone with a couple of months practice can do that. Most of us have the misconception that a good Software Engineer means he knows a lot of programming languages. That’s genuinely not the case. Yeah, learning one or two new programming language benefits. But that doesn’t help you become a good Software Engineer.
The software engineering culture is very much intimidating. It’s fun & challenging at the same time. If you love sticking to your laptop and solve interesting problems, then this might be the most passionate job you can look for. I am neither a nerdy engineer or expert on this culture. Today I am going to share what I observed & learned to work as a Junior Software Engineer for last one year. Yeah, folks, it’s been one year already ;). So let’s begin…
The range of skills required to become an excellent software engineer is vast. Like I told already learning to code is not enough. You need to learn a lot of other things too. It might seem a little bit overwhelming, trying to learn new things while adapting with this rapidly growing industry. But hey everything comes with a price.
Be humble
Be confident about your skills. But don’t be confident that much that you start feeling like you know everything. Once you start feeling that there’s no way you are going to learn something new. Truth be told the field is so vast that there’s no possible way you know everything. You will always have lacks. And without that, how would you know that you need to learn something new. So always have the attitude that you don’t know everything and willing to learn whenever required.
Learn to write clean code
Clean code and easy to understand code is a must. Your code should be easily understandable by the next person who looks over it. None of us likes messed up codes. You can learn writing clean codes by practice, getting ideas from seniors, reading blogs about it. My theory is that “Your code should be more beautiful than your attire” Let me give you some essential points to keep in mind while writing codes.
Meaningful variable name
Meaningful function/method name along with function documentation
Maintain spaces & tabs wherever needed
Avoid duplicating codes or unnecessary queries
This list goes on and on. It’s better to keep reading articles about it. Different programming languages have different coding structure. Follow those articles based on the programming language you are working.
Practice
The practice is the hardest part of learning. And it’s the essential part of your learning curve. You need to practice not once a month or week; you should practice every day. Even great musicians or artists practice their skills on a regular basis.
Learning theory and exploring new ideas is, obviously, essential to improving yourself in any discipline. The most important step, though, is turning those concepts into engrained knowledge and muscle memory. In this way, programming is a lot like learning an instrument.
Until you burn in those core concepts and you will need to continue to learn these throughout your career, you will struggle with the basic components of programming, for example-
Ways to approach a problem
How to break it down
How to test your code and find bugs
Quickly narrowing down the source of bug
How to improve performance and maintainability.
Validate users input.
Check with conditional statements to avoid errors.
On the surface, this seems like a dumb question, but it isn’t! Practicing an instrument diverges from programming because you can pick up a piece of music and play that same piece over-and-over until you get better. Programming doesn’t work quite the same way, because once you’ve solved a problem, you can, at best, iterate on that solution to improve it.
Don’t ask questions immediately
When you find yourself stuck somewhere, don’t start asking a question immediately. Try to solve that with any possible solution you can come up with. And if that doesn’t help, then start googling stuff or take suggestions from others. Find the solution and try to understand what you did wrong compared with the solution you found.
Don’t hesitate to ask or discuss
Don’t feel embarrassed by asking questions. It may feel little weird but trust me whenever you are stuck on a task for more than 30 minutes you really should ask a question or discuss with others. It will improve two things (1). Improvement with teamwork (2) Also has the ideas on how people approach different solutions for the same problem.
Find something to work on
The best way to learn is to find a problem you want to solve and try to solve it yourself. Maybe you want to automate something or calculate some value regularly.
Keep your eyes open in your own life for things that you would like to work better, or try to improve on something you already use. Then try to research and see if you can solve it. Don’t get caught up in finding a “perfect” solution, instead see how close you can get in a short amount of time.
These little exercises will keep your mind fresh and have the benefit of having no fixed goal so that you can have fun with them.
That’s all for today. Sorry for this looooooong article :p
Subscribe to our newsletter
Want to receive a fortnightly round up of the latest tech updates? Subscribe to our free newsletter. No spam, just insightful content covering design, development, AI and much more.